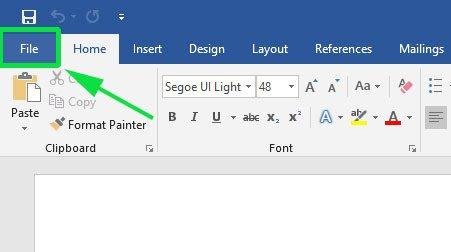
How to Insert a Checkbox In Word (☒) with Screenshots: Click ‘File’ tab, Options Tab, Customize Ribbon, Main Tab, Ok, Developer, Checkbox button
Checkboxes are a useful feature on Microsoft Word that makes your options easier to read and answer when creating surveys, questionnaires, and forms. They are essential in ensuring that you get your feedback in the shortest time possible and clearly and concisely. In this guide, we will teach you how to insert a checkbox in Word. And we will use Microsoft Word 2016 for this purpose. Without further ado, let’s get started.
How to Use Word Developer Tools to Insert a Checkbox?
If you aim to create a fillable form that features checkboxes, you will have to enable the Word developer tools. You can find this in the Word ribbon. To achieve this, all you have to do is follow the guidelines below:
- Click on the ‘File’ tab, as we have shown in the document below:

- Immediately you click on the ‘File’ tab, a pull-down menu will appear
- Click on ‘Options’ as shown in the image below:
- Clicking on the ‘Option Tab’ will pop open the window below
- Click on ‘Customize Ribbon’ on the left-hand side of the window, and ‘Main Tab’ on the right-hand side
- While still on the same window, under ‘Main Tab’ scroll down and mark the ‘Developer’ Checkbox
- Once you are done with this, Click ‘OK’
- If you followed this process correctly, the Developer Tab will appear on your Ribbon as shown below:
- Click on the ‘Developer’ Tab
- Now, to add a checkbox, click the ‘Checkbox button’ as shown in the image below:
- Take a look at the example below. We have 3 checklists with 3 checkboxes. The first Checkbox is ticked, while we left the others to represent other possible choices the respondent might select.
How to Insert Checkboxes in a Printed Document Using Bullets?
If all you want to do is print a document for a survey or questionnaire, you don’t need to stress yourself by going through the Developer tools Process. Basically, all you have to do is make use of Bullets. They come in handy in this circumstance. In fact, all you need to do is create a bullet list, then convert it from its default character into checkboxes.
To achieve this on the Word document, kindly follow the following procedures:
- Click on the Home tab. Navigate through and locate the bullet list icon.
- Once you locate it, click on the arrow beside it and select ‘Define New Bullet’ as shown in the image below:
- After clicking on Define New Bullet, a window will pop up
- On the window, click on ‘Symbol’ and press ‘Ok’ as shown below:
- If you follow this process correctly, another window will pop up. On this window click on ‘Font’ and change the font to ‘Winding2’ as shown below:
- Once you have successfully changed the font, navigate through the symbols and select that which closely resembles a checkbox.
- To save time, you can simply enter 163 in the Character Code Text Box as shown below
- Hit the ‘OK’ Button.
- If you follow these procedures correctly, your checkbox should resemble what we have in the image below.
This method is very easy for creating checkboxes for printed documents. However, it is important to note that these checkboxes are not interactive. This makes them impossible to use for online surveys. But, if you aim to make checkboxes for printed documents, then this method is the way to go.
How do I remove the checkbox in Word?
The fact is, you cannot learn how to remove a checkbox in word without first knowing how to add it. And since we have taken time to explain how to go about inserting checkboxes in word, now we will take you through how to remove checkboxes. To remove a checkbox from a word document, all you have to do is place your cursor somewhere on the line that contains the box. If you are hoping to remove more than one checkbox, highlight all the lines you wish to change.
After this, click on the arrow at the right-hand side of the ‘Bullet’ button. A window will pop up if you do this correctly on the window. Select the ‘None’ option. Immediately you do this. The checkbox should disappear and look like the second image below.
Conclusion:
Most checkboxes are rectangular or square in shape, but Microsoft Word allows you to use checkboxes of different shapes and sizes. To achieve this, you will have to select the ‘Shape’ you wish from the Symbol tab to give your checkbox a different feel. If you are looking to insert checkboxes into your word document for a survey, questionnaire, forms, or to-do list, you can leverage any of the easy steps listed in this article.
Also read Bullet Point Symbol [•] – How to Type in Word?